Unlock the Secret to the Best Easy Cheese Ball: A Timeless Holiday Appetizer Recipe
Cheese balls are incredibly easy to make when you follow our simple, step-by-step instructions.
The holidays are truly a magical time of year, aren’t they? It feels like just yesterday we were enjoying the warmth of summer, and now the crisp autumn air signals the approach of Thanksgiving and, before we know it, Christmas!
As the days fly by, often feeling faster each year, my anticipation for festive gatherings grows. There’s something uniquely special about this season – the twinkling lights, the cozy atmosphere, and, of course, the incredible food that brings everyone together. Whether it’s the excitement of children waiting for Santa or the joy of sharing a meal with loved ones, food plays a central role in creating those cherished holiday memories.
The Magic of Holiday Traditions (and Stress-Free Snacking!)
Every family has its unique traditions and beloved dishes that define the holidays. In our home, Christmas is a truly special event, especially with children. The sheer delight of knowing Santa is on his way, the ritual of leaving out milk and cookies, and the quiet anticipation as everyone finally drifts off to sleep – it’s all part of the unforgettable magic.
Christmas morning itself is a whirlwind of excitement. I honestly don’t know who’s more thrilled: the kids discovering what Santa brought, or the parents watching their faces light up with pure joy. And through all these moments, from Thanksgiving feasts to New Year’s celebrations, food remains a constant, comforting presence, weaving itself into the fabric of our family story.
Why This Cheese Ball is Our Go-To Christmas Eve Appetizer
One of our most treasured holiday traditions revolves around Christmas Eve: a laid-back, “snacky” evening. This approach to pre-Christmas dining has become a beloved ritual for several very practical, and often amusing, reasons:
-
The Last-Minute Shopper
My husband, bless his heart, has always been a bit of a Christmas Eve shopper. While he’s certainly improved over the years, picking up a few gifts in advance, there’s always that one crucial item he feels he still needs to procure on the day before Christmas. This means he might be home by early afternoon, or he could be strolling in closer to 7 PM, laden with last-minute treasures. For this reason, a flexible “snacky” meal is the only sensible option. It accommodates unpredictable schedules without the pressure of a formal sit-down dinner.
-
No One Has a Big Appetite
The anticipation of Christmas Day, the hustle of preparing food for the big feast, and perhaps a little quality control tasting of Santa’s cookies (to ensure he gets the very best, of course!) mean that big appetites are often in short supply on Christmas Eve. Everyone is usually too excited or too busy to settle down for a large meal. Having an array of delicious, easy-to-nibble foods means everyone can graze happily without feeling overly full or missing out on the festive atmosphere.
-
Fridge Space is a Premium
By Christmas Eve, our refrigerator is usually packed to the brim with a massive turkey and countless other ingredients destined for the Christmas Day meal. Finding even an inch of space for one more dish, let alone a container for leftovers, feels like an impossible mission. A cheese ball, which can be made ahead and stored compactly, is a perfect solution, requiring minimal fridge real estate before serving.
-
The Joy of Reuse
Any delicious snacks that aren’t devoured on Christmas Eve get a triumphant return appearance. They are strategically placed back out after Christmas breakfast, providing a much-needed sustenance for anyone who declares themselves “starving” while patiently waiting for the magnificent Christmas turkey to finish cooking. It’s a win-win, ensuring no delicious bite goes to waste!
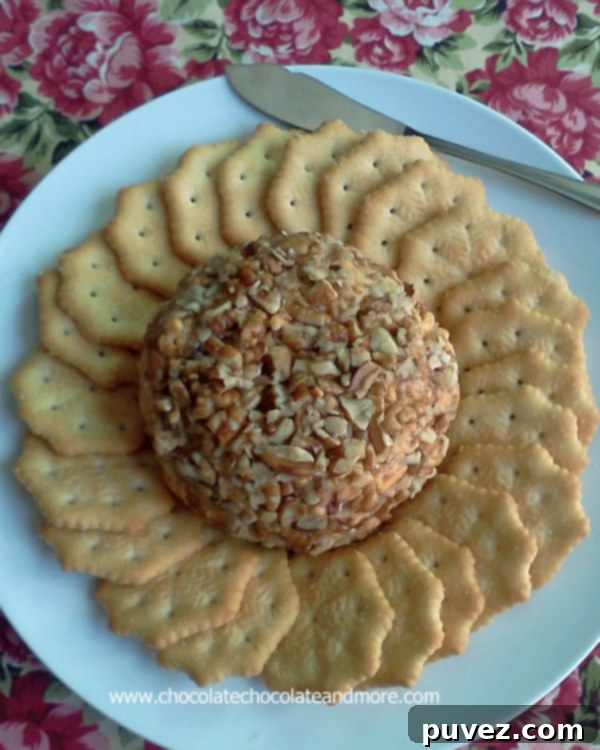
Among our favorite Christmas Eve snacks, a particular cheese ball stands out. It’s not just any cheese ball; it’s the official “Plains Special” Cheese Ring, a cherished recipe from none other than Rosalynn Carter, the lovely wife of President Jimmy Carter. This historic recipe comes from a beloved community cookbook, The Best of Byron, From Our Kitchen to Yours, adding a touch of presidential elegance to our holiday spread.
Rosalynn Carter’s “Plains Special” Cheese Ball Recipe
Rosalynn Carter’s Plains Special Cheese Ball

Ingredients
- 1 pound grated sharp cheddar cheese
- 1 cup mayonnaise
- 1 small onion, finely grated
- Freshly ground black pepper, to taste
- Dash of cayenne pepper (optional, for a subtle kick)
- 1 cup chopped nuts (e.g., pecans or walnuts), divided
For Coating:
- 1 cup chopped nuts (e.g., pecans or walnuts)
Instructions
- Combine Ingredients: In a large mixing bowl, thoroughly blend the grated sharp cheddar cheese, mayonnaise, grated onion, black pepper, and cayenne pepper (if using). Ensure all ingredients are well incorporated for a uniform flavor.
- Add Nuts & Chill: Stir in half of the chopped nuts (1 cup) into the cheese mixture. Cover the bowl and refrigerate for at least 1 hour. This chilling step is essential for the mixture to firm up, making it easier to handle and shape.
- Shape the Ball: Once chilled, turn the cheese mixture out onto a clean sheet of plastic wrap. Using the plastic wrap to assist, gently shape the mixture into a uniform ball. The plastic wrap helps prevent the mixture from sticking to your hands.
- Prepare for Coating: Spread the remaining 1 cup of chopped nuts evenly onto another clean sheet of plastic wrap or a shallow plate. This will serve as your coating station.
- Coat and Chill Again: Carefully transfer the shaped cheese ball onto the bed of chopped nuts. Roll the ball around, using the plastic wrap to help press the nuts onto its surface until it is fully and evenly coated. Wrap the coated cheese ball tightly in plastic wrap and refrigerate for at least one more hour before serving. This further firms up the cheese ball and allows the flavors to deepen.
Notes
Recipe adapted from ChocolateChocolateandmore.com and Rosalynn Carter’s “Plains Special” Cheese Ring.
Make-Ahead Tip: This cheese ball can be prepared up to 3-5 days in advance and stored in the refrigerator, tightly wrapped. This makes it an ideal appetizer for busy holiday schedules.
Serving Suggestion: Serve your cheese ball with an assortment of crackers, pita bread, celery sticks, carrot sticks, or pretzel thins for a delightful and versatile appetizer.
Did you make this recipe?
Please leave a comment on the blog or share a photo on Instagram!
Crafting Your Perfect Cheese Ball: A Detailed Step-by-Step Guide
Let’s walk through the process with more detailed visuals and explanations to ensure your cheese ball turns out perfectly every time. Precision in mixing and chilling is key to achieving that ideal consistency and shape.
Begin by placing your grated sharp cheddar cheese into a spacious mixing bowl. You’ll want enough room to thoroughly combine all the ingredients without making a mess.
Serving Your Delicious Cheese Ball (and a Dip Variation!)
This classic cheese ball is wonderfully versatile. It’s perfect served with an assortment of crackers – think butter crackers, water crackers, or even hearty rye crisps. Beyond crackers, consider serving it with crunchy vegetables like celery sticks, carrot sticks, or bell pepper strips for a healthier option. Pretzel thins also make a fantastic pairing, offering a salty crunch that complements the creamy cheese. Arrange it beautifully on a platter with your chosen dippers for an inviting appetizer spread.
If you prefer a softer, more spreadable option, this cheese ball recipe can easily be transformed into a delicious dip! When I prepare it as a dip, I simply add an extra cup of mayonnaise to the mixture. This creates a smoother, looser consistency that’s perfect for scooping with chips, pita bread, or even directly from the bowl with a spoon (we won’t tell!). Just ensure all ingredients are thoroughly blended to achieve that ideal, creamy dip texture.
More Festive Party Ideas for Your Holiday Gatherings
Looking for more crowd-pleasing appetizers and sweet treats to complete your holiday menu or party spread? We’ve got you covered! Here are some other fantastic recipes that are sure to be a hit with your family and guests. From savory snacks to delightful desserts, these ideas will help you create an unforgettable culinary experience.
We hope these ideas inspire you to create memorable moments and delicious food for your next gathering. Happy cooking!
