Easy Hawaiian Roll Cheese Danish Recipe: Your New Favorite Sweet Treat
Get ready to discover your new favorite breakfast pastry or a delightful dessert that comes together in a flash! This Hawaiian Roll Cheese Danish recipe takes the convenience of store-bought Hawaiian rolls and transforms them into a warm, gooey, and utterly irresistible treat. Forget complicated doughs and lengthy proofs – this simple recipe delivers all the classic Danish flavor with minimal effort, making it perfect for busy mornings or an impromptu sweet craving.

A Sweet Story: The Inspiration Behind This Simple Cheese Danish
My fiancé, Kal, has always had a special place in his heart (and stomach!) for cheese Danishes. If we ever found ourselves at a Starbucks – which, let’s be honest, is a rare occurrence given our budget-friendly approach to life – he wouldn’t even bother with a coffee. His order was always, without fail, a single, perfect cheese Danish. It’s a small indulgence he truly savors.
With our 7-year anniversary approaching this week, I wanted to do something special for him, a little culinary gesture from the kitchen. I was already knee-deep in Thanksgiving recipe experiments when a memory sparked: I recalled seeing a brilliant idea for cheesecake Danishes made using those wonderfully soft and sweet Hawaiian rolls. The concept was genius – using pre-made rolls to bypass the time-consuming pastry process.
Despite my best efforts, I couldn’t track down that exact recipe I had glimpsed so long ago. But that didn’t deter me! Armed with my baking instincts and a good understanding of what makes a cheese Danish truly delicious, I decided to improvise. I started whipping up a creamy filling and a sweet butter glaze, aiming to replicate the beloved flavor and texture of a traditional cheese Danish, but with the added convenience of the Hawaiian rolls.
The result? Well, I’m not sure if it’s an exact match for the mystery recipe I once saw, but I’m pretty confident it’s even better! These Hawaiian Roll Cheese Danishes are absolutely to die for. Each bite offers a delightful contrast: the edges of the rolls become beautifully crispy and golden, while the sweet, tangy, and incredibly creamy cheese filling melts in your mouth. It all comes together in a harmonious symphony of flavors and textures that you’ll want to keep all to yourself. Get ready to bake a batch and understand why sharing might just be the hardest part!
Why You’ll Love This Easy Hawaiian Roll Cheese Danish Recipe
This recipe isn’t just about making a cheese Danish; it’s about making it effortlessly delicious. Here are a few reasons why this will become a staple in your kitchen:
- Incredibly Easy: Seriously, if you can melt butter and mix ingredients, you can make these. No complicated dough, no proofing required.
- Quick to Prepare: From start to finish, you’re looking at about 20 minutes, making it ideal for a last-minute treat or a spontaneous craving.
- Deliciously Satisfying: The combination of sweet Hawaiian rolls, a rich cream cheese filling, and a buttery, cinnamon-sugar topping is pure bliss.
- Versatile: Perfect for breakfast, brunch, an afternoon snack, or a simple dessert.
- Crowd-Pleaser: Everyone, from kids to adults, will fall in love with these individual, portion-sized danishes.
The Magic of Hawaiian Rolls
What makes Hawaiian rolls so perfect for this recipe? Their inherent sweetness and soft, fluffy texture are key. When baked, they crisp up beautifully on the outside while remaining tender within, creating the ideal base for our creamy cheese filling. Their individual size also means perfectly portioned danishes, making serving a breeze and ensuring everyone gets their own little piece of heaven. It’s this ingenious shortcut that transforms a potentially lengthy baking project into a quick and delightful endeavor.
Essential Ingredients for Your Homemade Cheese Danish
Gathering your ingredients is the first step to creating these delightful pastries. You’ll notice that the list is short and sweet, featuring common pantry staples that are easy to find at any grocery store.
Hawaiian Roll Cheese Danish Ingredients:
- 1 package of Hawaiian rolls (12 rolls): The star of our show, providing the perfect sweet and soft foundation.
- 1/2 cup of unsalted butter, melted (1 stick): This will be combined with brown sugar and cinnamon to create a glorious glaze that soaks into the rolls.
- 1/4 cup brown sugar: Adds a rich, caramelized sweetness to the butter glaze.
- 1/2 tsp cinnamon: A classic spice that perfectly complements the sweet and creamy flavors.
- 8 oz cream cheese, softened: Crucial for that signature tangy, smooth, and rich cheese Danish filling. Ensure it’s truly softened to avoid lumps!
- 1 egg: Acts as a binder for the cream cheese filling, giving it structure and a custard-like consistency when baked.
- 1/3 cup granulated sugar: Sweetens the cream cheese filling to perfection.
- 1 tsp vanilla extract: Enhances all the sweet flavors in the filling, adding a comforting aroma and taste.
Step-by-Step Guide to Crafting Your Hawaiian Roll Cheese Danish
Follow these simple instructions to create a batch of these irresistible cheese danishes. It’s a straightforward process that yields impressive results!
1. Prepare Your Baking Dish and Rolls
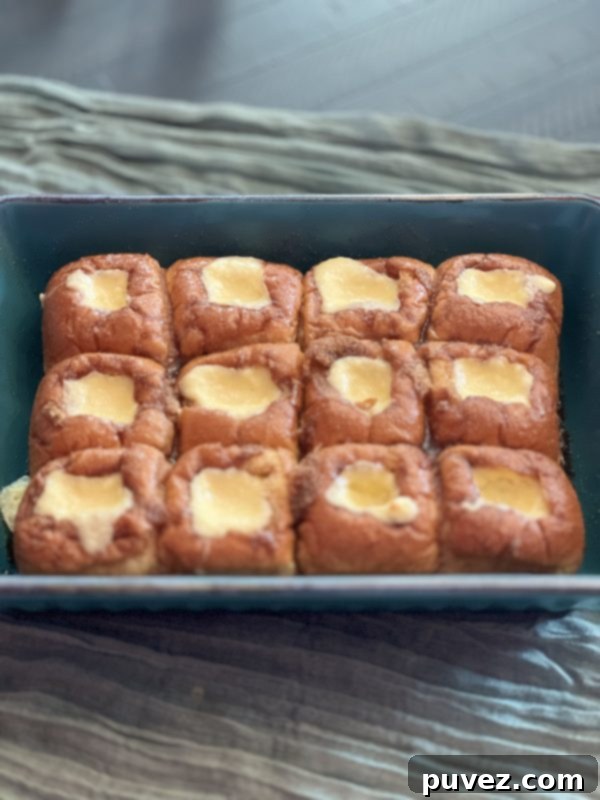
First, take a 9×13 inch casserole dish and grease it thoroughly. This prevents sticking and ensures your danishes release easily. Carefully place all 12 Hawaiian rolls as a whole into the prepared casserole dish. Using a small knife or your fingers, gently cut out the middle of each roll, creating a small well. Don’t go all the way through the bottom; you want to create a cup for the filling.
2. Create the Buttery Cinnamon Glaze
In a small microwave-safe bowl, melt the unsalted butter. Once melted, stir in the brown sugar and cinnamon until well combined. This aromatic mixture will be brushed generously onto each roll. Make sure to coat both the inside of the wells you created and the tops and sides of the rolls. This glaze will infuse flavor and help the rolls achieve a delightful crispiness during baking.
3. Prepare the Creamy Cheese Filling
In a separate medium-sized bowl, combine the softened cream cheese, granulated sugar, egg, and vanilla extract. Use a hand mixer or a whisk to beat the ingredients together until the mixture is completely smooth and creamy. Ensure there are no lumps of cream cheese, as this will affect the texture of your finished danishes. The vanilla adds a beautiful aromatic note that complements the tang of the cream cheese.
4. Fill and Bake to Golden Perfection
Using a spoon, carefully scoop the cream cheese filling into each of the holes you created in the Hawaiian rolls. Try to fill them evenly, but don’t worry if it’s not absolutely perfect – they’ll still taste amazing! Once all the rolls are filled, place the casserole dish into a preheated 375-degree Fahrenheit (190°C) oven. Bake for approximately 12-15 minutes, or until the rolls are golden brown and the cream cheese filling is set and lightly puffed.
5. Cool and Enjoy!
Once baked, remove the dish from the oven. It’s crucial to let the Hawaiian Roll Cheese Danishes cool for a little while before digging in. The filling will be extremely hot, and cooling allows it to set a bit more and become the perfect creamy consistency. A few minutes of patience will be rewarded with a warm, comforting, and utterly delicious treat!
Tips for the Best Hawaiian Roll Cheese Danish
- Softened Cream Cheese is Key: Don’t rush this step! Truly softened cream cheese will mix smoothly, preventing lumps in your filling. Take it out of the fridge at least 30 minutes before you start.
- Generous Glaze: Don’t be shy with the butter, brown sugar, and cinnamon mixture. It adds so much flavor and helps create that wonderful crispy exterior.
- Even Filling: While not essential for taste, trying to fill each roll evenly will ensure consistent baking and presentation.
- Watch Your Oven: Oven temperatures can vary. Keep an eye on your danishes during the last few minutes of baking. They should be golden brown and the filling just set.
- Serve Warm: While delicious at any temperature, these danishes are truly magical when served warm, allowing the creamy filling to be perfectly soft.
Delicious Variations to Try
This basic recipe is fantastic on its own, but it’s also a wonderful canvas for customization. Feel free to experiment with these ideas:
- Fruity Twist: Add a dollop of your favorite fruit preserve (like raspberry, strawberry, or apricot) on top of the cream cheese filling before baking.
- Chocolate Lover’s Delight: Sprinkle a few mini chocolate chips into the cream cheese filling or on top of the danishes before baking.
- Nutty Crunch: Add chopped pecans or walnuts to the butter glaze or sprinkle them over the top for added texture.
- Lemon Zest: For a brighter, more zesty flavor, add a teaspoon of fresh lemon zest to the cream cheese filling.
- Simple Glaze: After baking and cooling slightly, drizzle a simple glaze made from powdered sugar and a touch of milk or lemon juice over the danishes for extra sweetness.
Serving and Storage Suggestions
Serving:
These easy Hawaiian Roll Cheese Danishes are incredibly versatile. They make an excellent addition to a weekend brunch spread, a quick grab-and-go breakfast during the week, or a delightful after-dinner dessert. Pair them with a hot cup of coffee, a soothing tea, or a glass of cold milk for the ultimate comfort food experience.
Storage:
Leftover danishes can be stored in an airtight container at room temperature for up to 2 days, or in the refrigerator for up to 5 days. To reheat, simply pop them in the microwave for 15-30 seconds or in a toaster oven until warmed through. They taste just as good the next day!
Frequently Asked Questions (FAQs)
Can I use other types of rolls?
While Hawaiian rolls are highly recommended for their unique sweetness and texture, you could experiment with other soft dinner rolls. However, the distinct flavor of Hawaiian rolls really makes this recipe shine.
Can I prepare these ahead of time?
You can prepare the cream cheese filling a day in advance and store it in the refrigerator. Assemble and bake the danishes just before you plan to serve them for the freshest results.
How do I know when they are baked through?
The rolls should be golden brown, and the cream cheese filling should appear set, with a slight jiggle in the very center. It will firm up more as it cools.
Why cut out the middle of the rolls?
Cutting out the middle creates a perfect well for the generous amount of cream cheese filling, ensuring each bite is packed with flavor and creamy goodness.
This Hawaiian Roll Cheese Danish recipe is a testament to how simple ingredients and a clever shortcut can lead to an extraordinary treat. Whether you’re making them for a special occasion, a loved one, or simply to satisfy your own sweet tooth, these danishes are guaranteed to bring a smile to everyone’s face. Give them a try – you won’t regret it!
Hawaiian Roll Cheese Danish

5 minutes
15 minutes
20 minutes
Ingredients
- 1 package of Hawaiian rolls (12 rolls)
- 1/2 cup of unsalted butter, melted (1 stick)
- 1/4 cup brown sugar
- 1/2 tsp cinnamon
- 8 oz cream cheese, softened
- 1 egg
- 1/3 cup granulated sugar
- 1 tsp vanilla
Instructions
- Grease a 9×13 casserole dish. Place the Hawaiian rolls as a whole in the casserole dish. Cut out the middle of each roll.
- In a small bowl, melt the butter. Stir in the brown sugar and cinnamon. Brush onto each roll, the inside and the outside, generously.
- In another bowl, combine the softened cream cheese, granulated sugar, egg, and vanilla. Spoon into each of the hole of the Hawaiian rolls.
- Bake in a 375 degree oven for 12-15 minutes. Let cool for a little while before digging in!
Did you make this recipe?
Please leave a comment on the blog or share a photo on Instagram
More like this
Easy Cheese Danishes
Pie Crust Cookies
Apple Pie Danish
Easy Strawberry Sweet Rolls
Sugar Cream Crescent Pie
Pumpkin Cinnamon Rolls

