Homemade Ice Cream Cake Recipe: A Delightful Birthday Treat for All Ages
There’s something truly magical about birthdays, especially when they mark significant milestones. For me, watching my little girl, Grace, turn double digits — ten years old — was one of those moments. Suddenly, my baby wasn’t so little anymore; she was a pre-teen, full of personality and her own budding independence. While it’s bittersweet to see them grow, it’s also incredibly rewarding to witness the amazing person they’re becoming: smart, talented, kind-hearted, and beautiful, both inside and out. She has a fierce love for dance and singing, and increasingly, a mind of her own (and sometimes, an accompanying attitude!).
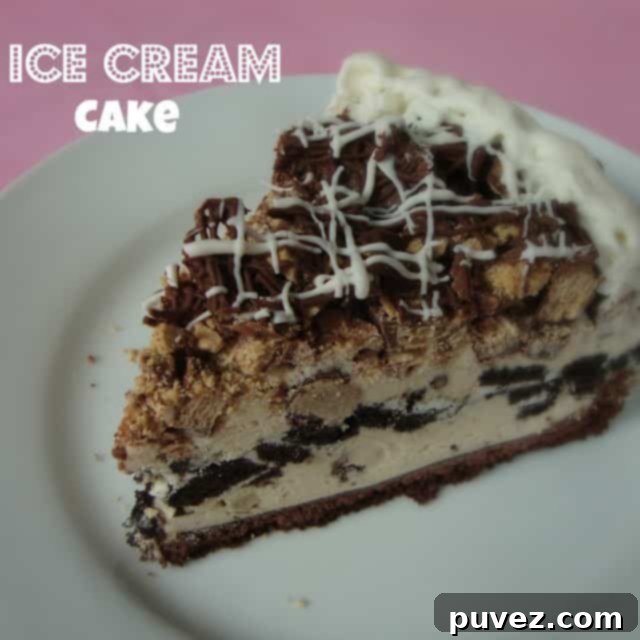
In our home, birthdays come with a cherished tradition: a family-only dinner where the birthday person chooses the meal and, most importantly, the cake. And it’s not just any cake; it’s a homemade creation, made with their enthusiastic help. This year, Grace’s choice was an ice cream cake, a culinary adventure I had always wanted to embark on! Her selection of Cookie Dough ice cream as the star flavor made it even more exciting. The absolute best part of this entire process? The fun we had making it together, creating memories that are just as sweet as the cake itself.
Why Choose a Homemade Ice Cream Cake for Your Next Celebration?
While store-bought ice cream cakes are convenient, there’s nothing quite like the satisfaction and deliciousness of a homemade version. It offers unparalleled customization, allowing you to tailor every layer to the birthday person’s exact preferences. Beyond the personalized flavors, making an ice cream cake at home is a fantastic activity to share with family, especially children. It’s less about precise baking measurements and more about assembly and creativity, making it a perfect project for little hands eager to help in the kitchen. Plus, the end result is a refreshing, show-stopping dessert that truly stands out.
Crafting Your Own Ice Cream Cake: Ingredients Spotlight
The beauty of this recipe lies in its simplicity and versatility. You can easily adapt the components to suit any taste. Here’s what you’ll need for a decadent ice cream cake, just like the one Grace and I made:
Key Ingredients:
- 1 half-gallon of ice cream: Or as close as you can get. Grace chose Cookie Dough, but feel free to pick your favorite! Vanilla, chocolate, strawberry, mint chip, or even a swirl variety would be fantastic. The key is to choose an ice cream that holds up well when slightly softened and refrozen.
- 1 layer of your favorite cake: We opted for a classic Devil’s Food cake, which provides a rich, chocolatey base that complements almost any ice cream flavor. A yellow cake, marble cake, or even a brownie layer would also work beautifully. You can use a boxed mix for convenience or bake your favorite from scratch.
- Crushed cookies: We went with regular Oreos for their perfect crunch and chocolatey goodness. However, any crumbly cookie works! Think graham crackers, chocolate chip cookies, shortbread, or even different flavored sandwich cookies. The crushed cookies add a crucial textural contrast to the smooth ice cream.
- Chocolate candy: For our cake, KitKats and Reeses peanut butter cups were the chosen toppers, adding varied textures and flavors. This is where you can truly let your imagination run wild. M&Ms, Snickers, Butterfingers, or even chopped chocolate bars would make excellent additions.
- Candy coating or chocolate chips: For that final, irresistible drizzle. You can use melting wafers, chocolate chips (milk, dark, or white), or even a prepared fudge sauce. This adds a professional touch and an extra layer of chocolatey delight.
To assemble this masterpiece, you’ll definitely need a springform pan. This type of pan is essential for easily releasing the cake once it’s frozen solid, ensuring a clean and impressive presentation.
Step-by-Step Guide to Your Delicious Ice Cream Cake
Now, let’s get down to the fun part – assembling your incredible ice cream cake. Remember, the key is to work quickly, especially when dealing with the ice cream, and don’t be afraid to get a little messy!
Preparation is Key: Softening the Ice Cream
- Soften the Ice Cream: Remove your chosen half-gallon of ice cream from the freezer and let it sit on the counter for about 15-20 minutes. You want it soft enough to spread easily, but not completely melted or soupy. It should have the consistency of soft-serve.
Building the Foundation: The Cake Crust
- Prepare the Cake Layer: Place your cooled layer cake on the bottom of the springform pan. If your cake layer is slightly smaller than the pan, that’s perfectly fine; you can gently press it out to the edges.
- Create the Crust: Use your hands or the back of a spoon to gently mush the cake down. This creates a compact, sturdy crust that will hold up beautifully under the layers of ice cream. This also helps to seal any gaps at the bottom of the pan.
The First Layer of Creamy Goodness
- First Ice Cream Layer: Take about half of the softened ice cream and spoon it over the cake crust. Using an offset spatula or the back of a spoon, smooth the ice cream evenly to coat the entire cake layer. Make sure it’s packed down gently to remove any air pockets.
Adding the Cookie Crunch
- Cookie Layer: Now for the delicious crunch! Break your cookies (Oreos, in our case) over the ice cream layer. You can crush them coarsely for bigger chunks or finely for a more even distribution. Gently press the crushed cookies into the ice cream. This step is where Grace really enjoyed getting involved!
The Final Ice Cream Layer
- Second Ice Cream Layer: Place the remaining softened ice cream on top of your cookie layer. Carefully spread it out, making sure to cover all the cookies and create a smooth, even top surface. This seals in the cookies and provides a perfect canvas for your final toppings.
Decorating with Candy and Drizzle
- Chop the Candy: Chop your chosen chocolate candies (KitKats and Reeses were our favorites) into bite-sized pieces. The varying sizes add visual interest and a delightful textural surprise with every bite.
- Sprinkle on Top: Liberally sprinkle the chopped candy over the top ice cream layer. You can arrange them decoratively or just spread them for an appealing, rustic look.
You could stop here, but why would you want to when you can add an extra layer of deliciousness?
- The Chocolate Drizzle: Melt your candy coating or chocolate chips. I often use my handy squeeze bottles for a clean, even drizzle, but a spoon or piping bag with a small hole works too. Drizzle the melted chocolate generously over all the toppings. This not only looks fantastic but also adds another layer of rich flavor.
Setting and Serving Your Masterpiece
- Freeze to Set: Place the springform pan in the freezer to set overnight. This crucial step ensures all layers are firm and will hold together beautifully when sliced.
- Serving Tips: About 10 minutes before serving, remove the cake from the freezer. This allows it to soften just slightly, making it easier to slice. You may need to run a thin knife around the edge by the springform latch to loosen it before releasing the sides of the pan.
A Little Lesson Learned: The Case of the Melting Whipped Cream
Just a little note from our experience: We thought it would be a decorative touch to add some Ready Whip around the edges right before serving. However, we discovered a somewhat “weird thing” about frozen cakes:
On a frozen cake,
the Ready Whip
melted
So, learn from our delightful mishap! If you want to add whipped cream, it’s best to do so just as you’re serving individual slices, or use a stabilized whipped cream recipe that holds its shape better on a cold surface.
Ice Cream Cake

Ingredients
- 1 half gallon of ice cream (or as close as you can get)
- 1 layer of your favorite cake (we used devil’s food)
- crushed cookies, we used regular Oreos
- Chocolate candy, we used KitKats and Reeces
- Candy coating or chocolate chips
Instructions
- You’ll need a spring form pan to make this. Remove ice cream from freezer and let sit on counter for about 20 minutes to soften.
- Place your layer cake on the bottom of the spring form pan. Mush the cake down to create a crust.
- Take about half of the ice cream and smooth it around to coat the cake layer.
- Now for the cookies. Break your cookies over the ice cream. Gently press into the ice cream.
- Place the remaining ice cream on top of your cookie layer.
- Chop your candy and sprinkle it on top of the cookie layer.
- Melt your candy coating or chocolate chips then drizzle on top.
- Place in the freezer to set over night. Remove from freezer about 10 minutes before serving. You may need to use a knife around the edge by the spring form latch to loosen.
Did you make this recipe?
Please leave a comment on the blog or share a photo on Instagram
Customization Ideas to Make it Your Own
This recipe is a fantastic starting point, but the possibilities for customization are endless! Here are some ideas to inspire your next ice cream cake creation:
- Ice Cream Flavors: Beyond cookie dough, consider pairing chocolate cake with mint chip, vanilla cake with strawberry ice cream, or a peanut butter cake with chocolate peanut butter swirl. For a sophisticated touch, try coffee or pistachio ice cream.
- Cake Bases: Swap out the devil’s food for a golden vanilla cake, a dense brownie, or even an Orea crust made from crushed cookies mixed with melted butter for a no-bake base.
- Cookie & Crunch Layers: Instead of Oreos, use crushed shortbread, Biscoff cookies, graham crackers, or even pretzels for a salty-sweet twist. You can also add chopped nuts like pecans or walnuts for extra texture.
- Candy & Toppings: Experiment with different candy bars, mini chocolate chips, sprinkles, or even fresh fruit like sliced strawberries or raspberries for a brighter flavor profile. A drizzle of caramel or hot fudge sauce would also be a fantastic addition.
- Decorations: Beyond the chocolate drizzle, consider piping homemade whipped cream (just before serving!), adding fresh berries, or decorating with birthday candles and festive sprinkles.
Final Thoughts on Your Sweet Creation
Creating this homemade ice cream cake with Grace was more than just baking; it was an experience. It reinforced the joy of family traditions, the sweetness of shared moments, and the simple pleasure of making something delicious from scratch. Whether you’re celebrating a milestone birthday, a special occasion, or just craving a fantastic dessert, this easy homemade ice cream cake recipe is sure to impress.
So gather your ingredients, enlist some eager helpers, and get ready to create a dessert that’s as fun to make as it is to eat. Enjoy the process, and savor every single scoop!
I’ll be linking up at some of these great parties!
