Mastering Homemade Kaiser Rolls: A Step-by-Step Guide to Baking Perfect Sandwich Buns
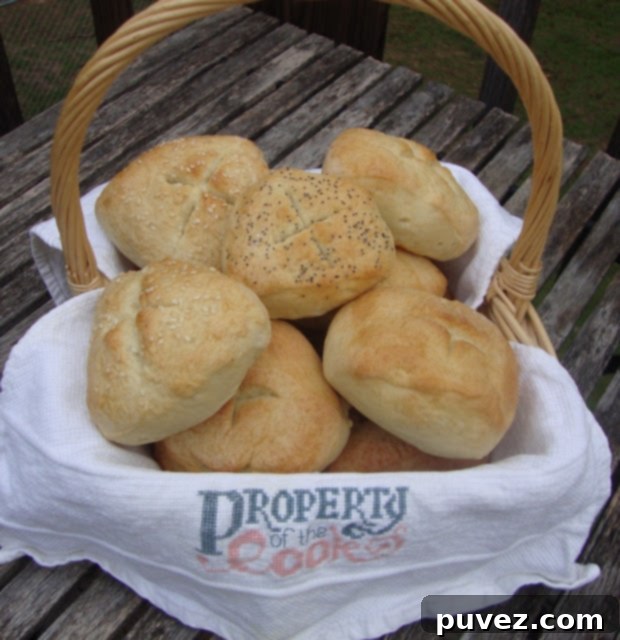
There’s something uniquely satisfying about a truly great roll. And when it comes to versatility, flavor, and that perfect balance of crusty exterior and soft, airy interior, few can rival the classic Kaiser Roll. These distinctive, star-shaped buns are not just good; they’re exceptional – whether as the foundation for your favorite sandwich or served warm alongside a hearty meat dish.
The Unbeatable Charm of Outdoor Dining and Homemade Bread
Let’s be honest, sandwiches are a staple in many households. For our family, with kids and busy weekends, they’re often the go-to for a quick and easy lunch. But there’s a profound difference between eating a sandwich at the kitchen table and enjoying one outdoors. Perhaps it’s the fresh air, the scenic view, or the shared experience, but outdoor sandwiches possess an unparalleled magic. Even a simple ham and cheese, prepared hours in advance and tucked into a cooler for a road trip rest stop, somehow tastes infinitely better than its indoor counterpart.
This realization often inspires a desire to elevate the experience, especially when special occasions or company are involved. So, when the idea of a fishing trip with good friends came up, the meal planning immediately began. Of course, sandwiches were on the menu – but these weren’t just any friends. They deserved something more than store-bought bread. It was time to bake.
Why Choose Kaiser Rolls for Your Next Adventure?
The quest for the perfect roll began with a clear set of criteria: it needed to be sturdy enough to hold up to various fillings, flavorful enough to stand on its own, and travel exceptionally well. Dinner rolls, while delicious, felt too delicate. A traditional loaf of bread, while comforting, would require slicing on site or pre-slicing, which can compromise freshness. My personal belief is that loaf bread is best enjoyed straight from the oven.
This led me, as it often does, to the trusted culinary haven that is King Arthur Flour. For any aspiring or experienced baker, this website is an invaluable resource. The company’s commitment to quality, its rich history, and its employee-owned structure are truly inspiring. If I lived anywhere near their Vermont headquarters, I might never cook from scratch again – their baking school and store are legendary! For now, I’m content to stock up on their exceptional flours at my local grocery store.
A quick detour to their site is always worthwhile. Beyond an extensive array of fantastic recipes, they offer comprehensive tutorials on bread making, including fascinating videos on commercial baking processes that, for me, demystified many aspects of the craft. It’s clear that the employees genuinely love their work, which speaks volumes about the company culture. Supporting such passionate, quality-driven businesses is always a pleasure.
And so, after browsing through countless tempting options, I landed on it: the perfect solution for our fishing trip feast – the Kaiser Roll recipe. Its promise of a sturdy, flavorful roll that could withstand travel sealed the deal.
Classic Kaiser Rolls Recipe: Ingredients You’ll Need
This recipe, adapted from King Arthur Flour, yields beautiful, delicious Kaiser rolls. Gathering your ingredients before you begin is always a smart first step in baking.
- 3 cups King Arthur Unbleached All-Purpose flour
- 1 1/2 teaspoons instant yeast (rapid rise)
- 1 1/2 teaspoons sugar
- 1 1/4 teaspoons salt
- 1 large egg
- 2 tablespoons unsalted butter, softened
- 3/4 cup water (lukewarm)
Step-by-Step Guide to Baking Perfect Kaiser Rolls
1. Mixing the Dough
In a large bowl, or the bowl of your electric mixer (if you’re fortunate enough to own one – I, for one, rely on a trusty hand mixer for this step), combine all the ingredients. Stir thoroughly until the dough begins to form a cohesive mass and starts to pull away from the sides of the bowl. With a hand mixer, you might find the dough becomes crumbly initially, but don’t worry, it will come together.
A few quick kneads directly in the bowl can often help bridge that crumbly stage, bringing all the ingredients together into a more uniform ball.
2. Kneading for Perfection
Once the dough has come together, transfer it to a lightly floured surface. Knead the dough vigorously for 5 minutes. This initial kneading helps to develop the gluten. Then, allow the dough to rest for 10 minutes. This resting period is crucial; it gives the flour a chance to fully absorb the liquid and allows the gluten strands to relax, making the dough easier to work with. After the rest, knead the dough for an additional 5 minutes, or until it feels smooth and supple. This dough is quite stiff, so be prepared for a good arm workout! If the dough feels too dry, add a tiny bit of water; if too sticky, a small amount of flour. The goal is a firm but pliable dough.
3. The First Rise: Developing Flavor and Volume
Lightly grease a clean bowl, transfer the kneaded dough into it, and cover it with a cloth or plastic wrap. Place it in a warm, draft-free spot and allow it to rise until it’s noticeably puffy – this usually takes about 1 hour. This first rise is essential for developing the deep, rich flavor characteristic of good homemade bread.
4. Dividing and Shaping the Rolls
Once risen, gently turn the dough out onto a lightly greased work surface. Divide the dough into six equal pieces. A sharp knife or a pizza cutter works perfectly for this. Roll each piece into a tight, round ball. Place these dough balls onto a lightly greased or parchment-lined baking sheet.
Now comes the signature Kaiser roll shape! Working with one ball at a time, center your Kaiser stamp over the dough. Press down firmly, aiming to cut to the very bottom of the roll but *not* all the way through. This depth is critical: if you don’t cut deep enough, the beautiful star pattern will disappear during baking. Cut too deep, and the roll will open into individual “petals” resembling a daisy, rather than the classic Kaiser shape. Practice truly makes perfect here. If you don’t have a specific Kaiser stamp, a sharp knife can be used to cut a deep cross pattern into the top of each roll, achieving a similar aesthetic.
5. The Second Rise: Proofing for Volume and Texture
After shaping, carefully flip the rolls so they are cut-side down onto the prepared baking sheet. Cover them with a cloth and allow them to rise for another 45 minutes to 1 hour, or until they have almost doubled in volume. This second rise, known as proofing, creates the light, airy texture within the rolls.
6. The Finishing Touch: Glaze and Seeds (Optional)
Once proofed, turn the rolls right side up. For an appealing golden crust and a surface for seeds, lightly dip the tops of the rolls in milk. You can then coat them with poppy seeds, sesame seeds, or a combination of both, if desired. This adds both visual appeal and a delightful crunch.
7. Baking to Golden Perfection
Preheat your oven to 425°F (220°C). Once hot, place the baking sheet with the rolls into the oven and bake for 15-17 minutes, or until the rolls are beautifully golden brown and sound hollow when tapped on the bottom. The rich color indicates a perfectly cooked crust and a tender interior. Carefully remove them from the oven and transfer them to a wire rack to cool completely. This allows steam to escape, preventing a soggy bottom and ensuring a crisp crust.
Tips for Successful Kaiser Roll Baking
- Don’t Rush the Rise: The rising times are approximate. Focus on the visual cues – “noticeably puffy” and “almost doubled in volume” – rather than strict timing, as ambient temperature and humidity can affect yeast activity.
- Accurate Measuring: Especially for bread baking, precise measurements are key. Use a kitchen scale for flour if possible for the most consistent results.
- Lukewarm Water: Ensure your water for the yeast is lukewarm (around 105-115°F or 40-46°C). Too hot will kill the yeast, too cold will slow it down considerably.
- Kneading is Key: Don’t skimp on kneading time. Proper gluten development is essential for the structure and chewiness of the rolls.
- Practice Shaping: The Kaiser stamp cut takes a little practice. Don’t be discouraged if your first batch isn’t perfectly symmetrical. They’ll still taste amazing!
Serving Suggestions and Storage
These homemade Kaiser rolls are incredibly versatile. Beyond being the ultimate vessel for your favorite deli meats, cheeses, and fresh veggies, consider these ideas:
- Breakfast Sandwiches: Pair with eggs, bacon, or sausage for a hearty start to your day.
- Sliders: Cut smaller and use for mini burgers or pulled pork.
- Garlic Bread: Slice in half, spread with garlic butter, and bake until golden.
- Soup Dippers: Their sturdy crust makes them perfect for soaking up rich stews and soups.
- Open-Faced Toasts: Top with avocado, cream cheese, or bruschetta.
For storing your freshly baked Kaiser rolls, an old bread wrapper (recycled from a loaf of store-bought bread) works wonderfully to keep them fresh for a few days at room temperature. It’s a simple, eco-friendly way to extend their deliciousness! For longer storage, freeze them in an airtight bag and simply thaw and warm when ready to enjoy.
Baking your own Kaiser rolls is a rewarding experience that elevates any meal. The effort put into these beautiful, flavorful buns will be evident with every bite, making even the simplest sandwich feel like a gourmet delight. Happy baking!
You Might Also Like
If you enjoyed baking these Kaiser rolls, explore more delightful bread recipes:
Light and Fluffy Dinner Rolls

Potato Bread
